Some complex WordPress themes having many customization options & functionalities may have very hard coding to understand. Understanding that code can become really very challenging specially when you are not expert in coding. However the WordPress being a open source platform, it offers range of tools that are available in form of Free plugins, premium plugins which can help you customize the themes without writing or editing a single line of code. Our UrabanMojos WordPress team has compiled a list of steps to help you customize your theme more effectively.
1. Right Choice of Theme
Before going more into customization choosing the right theme in the first place is very important. We have observed that choosing the wrong theme in the first place and then trying to customize it as per your needs can become very frustrating.
For Example, if you are building a Website for a School thus you have to first start with a website template having elements that a School website would need like Education information, student section, Fees section etc. But in that case if you choose a wrong template say, you choose a Hotel Theme for the purpose of building School website it may become frustrating for you to customize all the options and make a Hotel Template look like a School Website.
Thus choosing right theme and template will save you a lot of trouble in the future. Many themes come with built-in customization options that can significantly simplify your task. Popular themes like Astra, OceanWP, and Neve offer extensive customization features without requiring any coding knowledge.
How to install & activate a theme in WordPress :
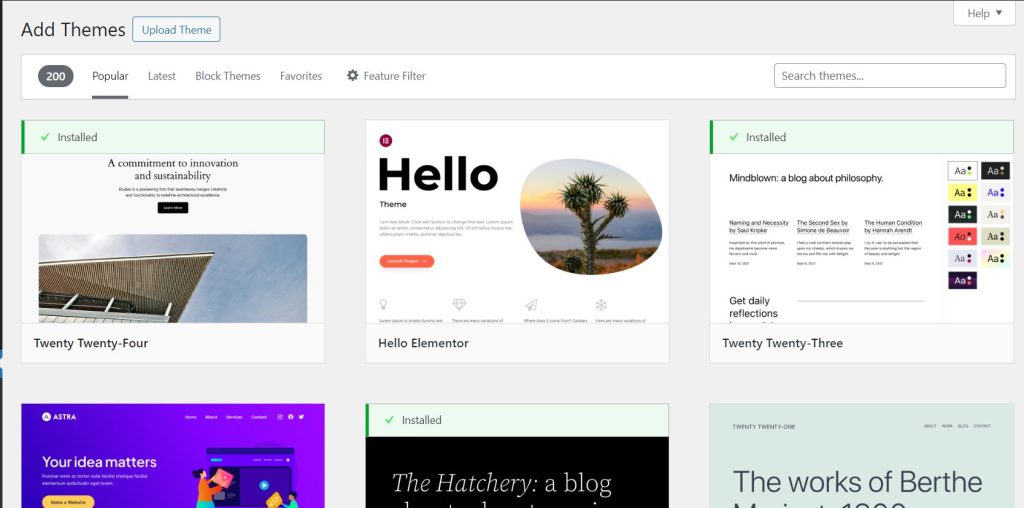
Steps to Choose a Theme:
As shown in the above screenshot, there are two options to install a theme in WorrdPress. You can either Upload a theme file in .zip format or you can choose a theme directly from WordPress repository and then activate it. Remember once you install a WordPress theme you have to then Activate for that theme to take effect.

- Go to Appearance > Themes in your WordPress dashboard.
- Click on Add New to browse the available themes.
- Use the Feature Filter to find themes with specific features.
- Preview and install the theme that best fits your needs.
2. Customization Options in WordPress theme
WordPress has the in-built theme customizer which is a very powerful tool to edit and customize your theme as per your needs. You can access it by navigating to Appearance > Customize. Here, you’ll find various options to tweak your theme’s settings. For your reference we have added the screenshot below about the options which are available in the theme customizer.
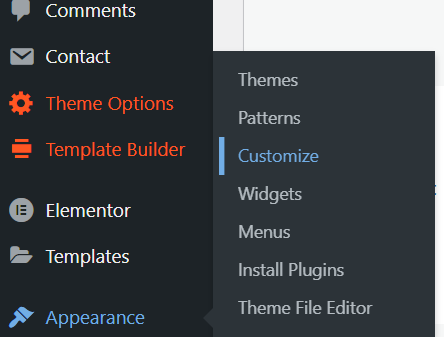
As you can see in the above screenshot, there is a default in-built WordPress tool which will be present in the path Appearance -> Customize. Here you can edit all the customizable options present in your theme.
Options present in the Cutomizer of theme on WordPress which you can edit :
Site Identity: Here you can change your site title, tagline, and upload a logo. By default tagline part will be blank in which you can add site tagline there.
Colors: Modify the primary colors of your theme such as Header color, Footer color and various background colors.
Menus: Create and manage navigation menus.
Widgets: Add and arrange widgets in your sidebar and footer.
Homepage Settings: Set a static front page or a blog feed. You can make your Homepage a dynamic page which you can add in many categories.
3. Installing a Page Builder plugin
Page builder plugins like Elementor, Beaver Builder, and WPBakery Page Builder provide a drag-and-drop interface for designing your site. These plugins come with pre-built templates and modules that you can customize to create a unique layout.
Popular Page Builders:
- Elementor: Known for its user-friendly interface and extensive template library.
- Beaver Builder: Offers robust features and is compatible with most themes.
- WPBakery Page Builder: Provides a comprehensive set of design elements and templates.
Steps to Install a Page Builder:
- Go to Plugins > Add New in your WordPress dashboard.
- Search for the desired page builder plugin.
- Click Install Now and then Activate.
- Start creating and customizing your pages using the page builder interface.
4. Use Plugins for Additional Functionality
There are numerous plugins available to extend the functionality of your WordPress site without coding. From sliders and galleries to contact forms and social media integration, plugins can help you add and customize various features.
Must-Have Plugins:
- Slider Revolution: Create stunning sliders and carousels.
- Contact Form 7: Easily add contact forms to your site.
- WPForms: A beginner-friendly form builder with drag-and-drop functionality.
- WooCommerce: Add eCommerce capabilities to your site.
Steps to Install a Plugin:
- Go to Plugins > Add New.
- Search for the plugin you want to install.
- Click Install Now and then Activate.
- Configure the plugin settings as required.
5. Customize Widgets
Widgets are small blocks that perform specific functions and can be added to your site’s sidebar, footer, and other widget-ready areas. You can customize your site’s look and functionality by adding and arranging widgets.
Common Widgets:
- Text Widget: Add custom text, HTML, or shortcodes.
- Recent Posts: Display a list of your latest blog posts.
- Categories: Show a list of post categories.
- Custom HTML: Insert custom HTML code without touching the theme files.
Steps to Customize Widgets:
- Go to Appearance > Widgets.
- Drag and drop the desired widgets into the widget areas.
- Configure the widget settings.
- Click Save to apply your changes.
6. Leverage Pre-Made Templates
Many themes and page builders offer pre-made templates that you can import and customize. These templates can save you a lot of time and effort, providing a solid foundation that you can tweak to match your branding and style.
Steps to Import a Template:
- Go to the page or post editor.
- Click on the Add Template button (specific to the page builder you are using).
- Browse through the available templates and select one.
- Import the template and customize it using the page builder’s tools.
7. Adjust Your Theme’s Settings
Some themes come with their own settings panel that allows you to customize various aspects of your site without needing to code. These settings panels are typically found under Appearance or in a dedicated theme options section.
Common Theme Settings:
- Layout: Adjust the overall layout of your site (e.g., full-width, boxed).
- Typography: Change the fonts and sizes used on your site.
- Colors: Customize the color scheme.
- Header and Footer: Modify the layout and content of your header and footer.
Steps to Access Theme Settings:
- Go to Appearance and look for your theme’s settings panel.
- Navigate through the available options and make the desired changes.
- Save your settings.
To explore the plethora of themes click here & visit WordPress Theme Page
Learn more about blazing fast and most customizable themes WordPress has to offer, visit our latest article on Fastest WordPress themes : Top 5 Blazing Fast Free WordPress Themes for Beginners – Make your website 5X faster with these themes